So, now you are just off an writing - easy enough. So, what are you looking to actually write about here today … I think that first article is about practicing with baseof, single and list templates.
Writing this way actually isn’t all too bad - you haven’t had to do all too much configuration or messing around and you already have things working.
Keep going, Neal, you are almost done creating your first post of the day! Awesome work. Now take Asher for a walk and follow the plan.
Something that you are going to have to work through is NOT using Floats in the recent article banner.
You also need to figure out why links are displaying correctly within the content blocks!
Not for now, let’s finish this article.
And the writing is finished. lets get the images created, next!
Practice Lab No 1. - Creating Layouts
From our earlier post, Let’s Build Some Default Layouts, we should already have a baseof.html layout file located in our layouts/_defaults directory. Let’s expand upon that layout and see how we can make it better.
Within the same directory, let’s create two files and see how they work. list.html and single.html. On a Mac or Linux you can do that with the command:
$ touch layouts/_default/single.html
$ touch layouts/_default/list.html
SIDENOTE: remember - you don’t need to type the $ , that is just a convenient way of representing what to type into a terminal window.
baseof.html, single.html, and list.html are all related and actually work together to form a layout. However, this is something that wasn’t clear to me when I was learning Hugo. Let me explain how these templates can, just like in a parent-child relationship, work together to produce a layout.
Delegating to a Child Layout
Within the baseof.html file let’s create a specific layout for a single page. Here is the code and then we’ll talk about what is happening:
{{ block "main" . }}
<- the main content of the page which will be defined in either list or single ->
{{ end }}
before we go too far, let’s jump over to single.html in order to connect the dots of how these two tie together:
{{ define "main" }}
  {{ .Content }}
{{ end }}
Let’s describe what is going on here in the above two code snippets. In the baseof.html template we define a {{ block "main" . }} block. This block is defined with a name of “main” which should be pretty obvious. As Hugo processes the layouts
We'll go through how these are processed later in this article
it keeps a placeholder that essentially says “this block will be defined in a layout that will be loaded later”.
Then, we get to the “later” part of that statement when Hugo processes the single.html layout. As it runs through the layout it finds a define block of the exact same name. When it finds this block it knows that it must insert whatever is included inside the block back into the originally baseof.html layout.
Let’s recap:
- Hugo reads in the
baseof.htmllayout and sees that there is a block namedmain. It creates a placeholder to wait until it processes a later layout to fill in that block. - Hugo reads in the
single.htmllayout and see the definition for themainblock and then inserts whatever is within that block back into thebaseof.htmllayout.
In this way, the two layouts, baseof.html and single.html are nested together, one inside the other. This is an important concept to understand in several scenarios. Here’s why:
It can be super, super frustrating when you write a layout and then go to see the results in your browser only to see … nothing! That’s right a big screen of emptiness. Not seeing anything is actually worse than seeing an error. If you see an error, at least you can search for that error or at least the error message itself will give you some indication of what went wrong.
However, the most common cause for issues are related to this nesting. Say for example, in the single.html file we forget to define a main block. What happens? Hugo happily renders the page with a big ‘ole blank for that spot in the block. What happens if we fat finger the {{ define "Main" }} block?
See what I did there? Capitalized 'Main'. Yup, that was my mistake which caused me endless frustration!
.
The define block name and the block name in the parent template must match exactly otherwise hugo will think that you meant some other template named ‘Main’ and not ‘main’.
Our Layouts in Action
Now that we have two layouts, lets see them in action by creating some sample web pages. Well, if you were following along from back in Hugo: Getting Started without a Theme you already have a page, my-first-post.md. It has basically no content, but it should still be viewable if you start up the hugo webserver with
$ hugo -D serve
and then navigate to:
localhost:1313/my-first-post/
Let’s test out our new template by making a quick edit and verifying that our layouts are actually being loaded and used. In the single.html layout let’s add an H1 html element above our conent to test this out, edit and then save your single.html file with the following change:
{{ define "main" }}
  <h1>This is the single.html layout rendered!</h1>
  {{ .Content }}
{{ end }}
after you save, if your browser was still on the page you should see the following:
[TODO _ INSERT IMAGE]
Now, for fun, let’s take a look at what happens were we to mistakenly type the wrong thing in the template … let’s change it to:
{{ define "Main" }}
  <h1>This is the single.html layout rendered!</h1>
  {{ .Content }}
{{ end }}
… and you should see the following emptiness! So, pro-tip, when working with Hugo and you are seeing literally nothing and aren’t seeing any errors, one of the best places to troubleshoot is whether or not you have a typo somewhere in your layouts.
Now, these are just two layouts here, however, it turns out you can have a nearly limitless number of layouts, each structured within it’s own directory, so this can get complicated. However, starting with the right foundation and understanding will make working with Hugo a pleasure versus a struggle.
Wait, What About List.html?
You are correct, astute reader! We’ve not yet seen list.html used in action. Let’s change that. First off, let’s create the layout by creating a file named list.html within the layouts/_default directory with the following content:
{{ define "Main" }}
  <h1>This is the list.html layout rendered!</h1>
  {{ .Content }}
{{ end }}
And if we refresh our page, we’ll see that the my-first-post is still rendering the single template. In order for Hugo to render the list.html layout it needs to be rendering content that it believes is supposed to be a list. This is best explained using an example.
The most common example is a list of posts, as in say a site that wants to publish multiple articles all with roughly the same layout. Let’s do that by first creating a directory to hold all of these posts:
$ mkdir content/posts
will create a directory named posts underneath the content directory. Next, let’s create two sample posts so that we have two things to display in our list.html layout:
$ hugo new posts/my-second-post.md
$ hugo new posts/my-third-post.md
Each of those commands will create a new file, with that name and within the posts directory. If you open either of those files up you see:
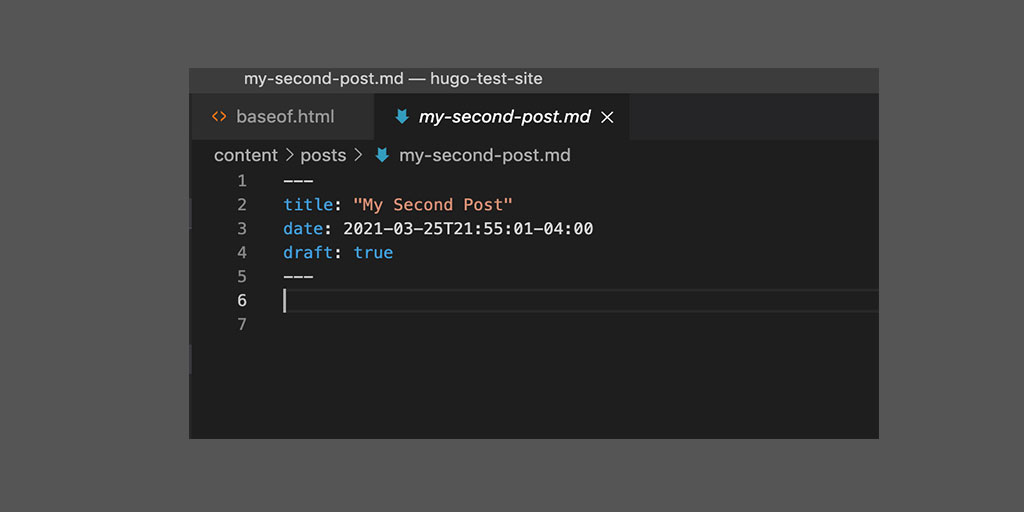
My Second Post
Whoa!@#!? What is with the --- and the strange lines at the top of this file? Don’t worry, we’ll go over what those are in a later blog post.
It is called front-matter and it's a way of describing the content that is included in that post, but, we'll have a lot more to say about front-matter soon.
Cool, so now we have two content pages and we’d like to display them in a list as many blogs do. To do that, let’s create one last file that will define how that will work:
$ hugo new posts/_index.md
Here, we are creating just another content file, it has the exact same format and structure as any other content file, however, it has a special name that Hugo looks for when rendering layouts, _index.md. Because it has that name, Hugo, when it looks to render that file will look to load the list.html template. We can see this in action by heading over to browser and typing in:
localhost:1313/posts/
Woot!!! Celebration!!! We should now see the following:
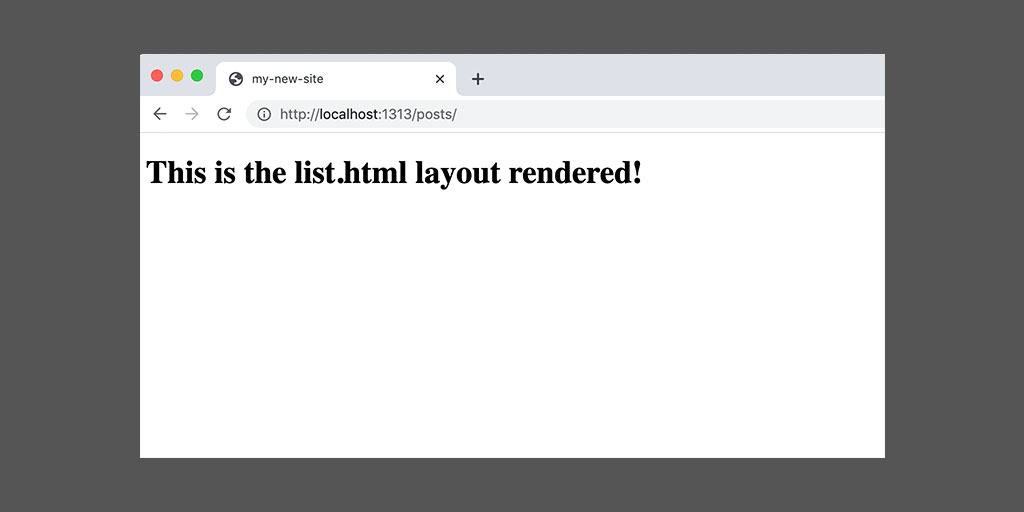
Rendering the List
This shows that our list.html template was rendered instead of the single.html template as we can see by the h1 html element. But wait! We aren’t actually displaying a list of our blog posts, like we had originally said we would. That’s much easier now that we are using a list.html template, we can edit that template to the below:
{{ define "main" }}
  <h1>This is the list.html layout rendered!</h1>
  <ul>
    {{ range .Pages }}
      <li><a href={{.Permalink}}>{{.Title}}</a></li>
    {{ end}}
  </ul>
  {{ .Content }}
{{ end }}
and if we save, we’ll see:
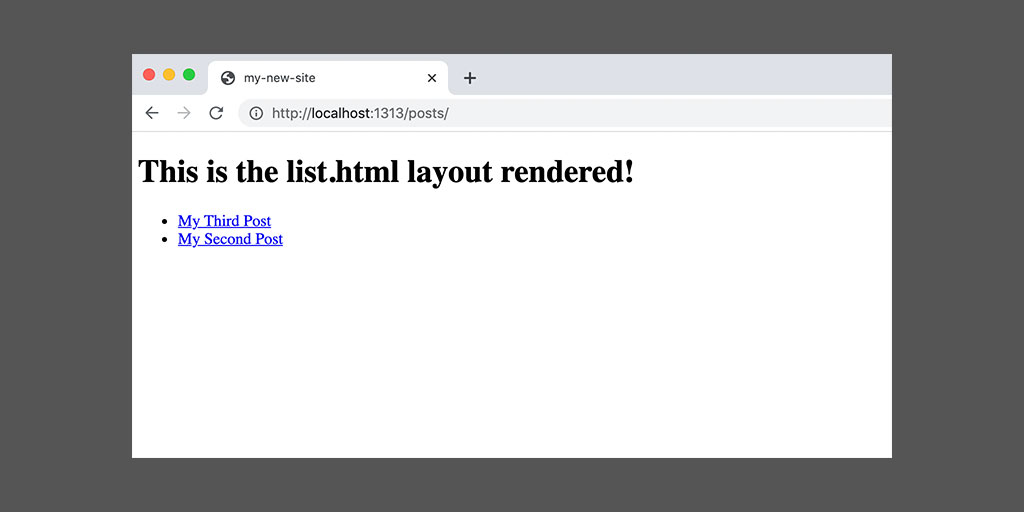
Rendering the List, with posts
Awesome - our basic list of blog posts. Now, there is a lot of details to unpack and review about the above layouts short tl;dr: List templates provide a `.Pages`, which will represent each page within a given directory that we just cut and pasted in. However, we’ve accomplished A BOAT LOAD in this Practice Lab, let’s take a break and we’ll cover directory structures and more complext layouts in future blog posts.